Extracting 3D Models From CesiumJS - Part 1: Terrain Map Scraping
en- CesiumJS Terrain Map Scraping
- CesiumJS Terrain Map Parsing
CesiumJS is a open source JavaScript framework for rendering 2D and 3D maps - everything from a local area to whole planets - in a web browser using WebGL. In the past few weeks I've been working on obtaining 3D model data in a situation where the only easily available way of accessing the data is through a CesiumJS based viewer. As far as I know, Cesium deals with two different kinds of 3D data: On one side, there's 3D models used for small-scale objects like buildings, on the other side there's terrain maps.
Addressing Terrain Tiles
To get started with the terrain map, I needed to figure out how to obtain terrain data for a certain geographical region. Luckily, this is fairly well documented. CesiumJS uses its own solution called quantized-mesh.
quantized-mesh supports different "zoom levels", for which the whole
globe is divided into more and more single "tiles". At level 0, there
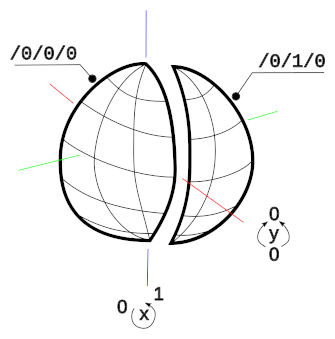
are only two tiles: the first tile covers the western hemisphere, the
second tile covers the eastern hemisphere. With each increase in zoom
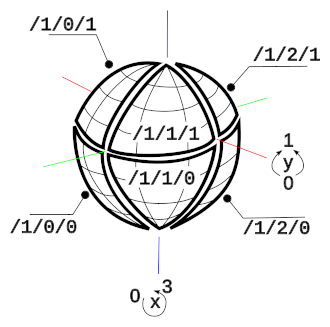
level, each tile is split into 4, each new tile containing a quadrant
of the previous tile. Each tile can then be identified by its zoom
level, a x coordinate and a y coordinate. x starts at 0,
representing -180° longitude, and when incrementing x, you go
eastward until you reach the tile ending at +180° longitude, at
x=2^(z+1). y=0 starts at the south pole at -90° latitude,
going north, and reaches +90° latitude at y=2^z. No +1
in the exponent here, since for full coverage, x needs to cover the
full 360° longitude, while y only needs to cover half as much for a
total of 180° latitude.
Using these three variables, z,
x and y, the quantized-mesh specification defines an URL
template for addressing an individual tile via HTTP:
http://example.com/tiles/<z>/<x>/<y>.terrain
This can be a little hard to imagine, so I attempted to visualize the first two zoom levels in Figure 1.


If you're familiar with OpenStreetMap, you may recognize this way of dividing the globe into tiles and addressing individual tiles. An OpenStreetMap tile URL looks like this: https://tile.openstreetmap.org/14/8537/5725.png. This similarity is not accidental; in fact, the quantized-mesh tiling schema was designed to follow the Tile Map Service standard's tiling schema.
All of the above assumes our data source uses a WGS84 projection and
the TMS tiling schema. quantized-mesh supports other configurations
as well, where there is only a single tile at level 0, or with the x
and y coordinates swapped. You can find more information in the
documentation.
Mapping Geographical Regions to Terrain Tiles
Now that we know how quantized-mesh tiles are addressed, let's find
out which tiles we actually need. In my use case, I wanted to obtain
all tiles in a bounding box defined by lower and upper latitudes and
longitudes. Converting x and y to coordinates is quite easy:
lat = -90 + y * 180 / (2**z)
lon = -180 + x * 180 / (2**z)
So to get the ranges for x and y, we solve those equations for x and
y and add proper rounding:
x_min = floor( lon_min * (2**z)/180 + 2**z     )
x_max = ceil(  lon_max * (2**z)/180 + 2**z     )
y_min = floor( lat_min * (2**z)/180 + 2**(z-1) )
y_max = ceil(  lat_max * (2**z)/180 + 2**(z-1) )
The resulting ranges, with x_max and y_max being exclusive upper
bounds, are then formulated as
tiles_x = range(x_min, x_max)
tiles_y = range(y_min, y_max)
So once we know at which zoom level our tiles are available, we can compute which tiles to download in order to fully cover our region.
Scraping Terrain Tiles
Now all that's left to to is to figure out how to actually download the individual tiles. Your web browser's inspector can be a great help here. Open the Cesium-based application in your web browser, and open the inspector's network tab. As you move around in the map, you will most likely see a lot of requests, which can be grouped into the following categories:
- Image tiles, addressed in the same way as the terrain tiles. I didn't need these for my use case, but you should be able to scrape them the same way I'm scraping the terrain tiles.
- 3D models, with file extensions of
b3dm,glbandcmpt. I'll take a look at some of those in later articles. - The terrain tiles, with a file extension of
terrain. These are the ones we want to obtain.
As you zoom in and out of the map, you'll see that the zoom levels in the requests to image and terrain tiles will increase or decrease. Since I wanted the most detailed tiles, I just continued with the maximal zoom level that was available in the application i was working with.
Now just right click on one of the terrain requests, and navigate to
Copy / Copy as cURL. You'll get something like this:
curl 'https://maps.example.com/terrain/tiles/12/12345/12345.terrain' \
  -H 'Origin: https://maps.example.com' \
  -H 'Accept-Encoding: gzip, deflate, br' \
  -H 'User-Agent: Mozilla/4.0 (compatible; MSIE 8.0; Windows NT 5.1; ...)' \
  -H 'Accept: application/vnd.quantized-mesh,application/octet-stream;q=0.9' \
  -H 'Referer: https://maps.example.com/' \
  --compressed
At least the Accept header is usually required, and the
quantized-mesh specification recommends setting it, especially since
it's used to tell the server which extensions to the quantized-mesh
standard are supported by the client, if any. Some other headers,
especially the Origin, Referer and User-Agent may be required as
a "soft form of access control", depending on the server's
configuration. I found it worked best to just keep the entire curl
request as-is, and only modify the z, x and y parameters in the
URL.
Knowing the supported values for z and our ranges for x and y,
we can now easily script the download of the individual files. A
small hint regarding the filenames: Use all three parameters, z, x
and y in the output filename, otherwise you end up overwriting the
same files over and over again.
Once the download is done, we are left with a bunch of binary
.terrain files. The next article will cover how to parse them.