Libvirt to Proxmox VE Migration
enIn our hackerspace, we were running a single-node hypervisor for some virtual machines on hardware that was roughly 15 years old. As this system was not only old, but also loud and power-hungry, we wanted to replace it with a more modern one that we had recently obtained.
We also wanted to replace the hypervisor solution: The old system was using libvirt with the VM disks on LVM volumes. For the new system, we wanted to switch to Proxmox VE and its builtin ZFS storage.
However, this change in storage format also meant that we couldn't
simply copy the VM disks with dd or similar, as a conversion by
Proxmox was required. Luckily, this storage migration
is only a matter of a few clicks in the Proxmox web interface.
Furthermore, it can be done live, i.e. while a VM is running.
Therefore we came up with the following approach for migrating all VMs with as little downtime as possible.
Storage Migration Approach
The general idea was to set up the old hypervisor as an iSCSI target that exposes the LVM volumes as LUNs, and set up Proxmox to use this iSCSI target for storage.
We would then create new VMs on Proxmox that resembled the old libvirt
VMs as closely as possible necessary, and initially set up
these VMs to boot from the already existing iSCSI volumes. As a final
step, we would then perform a live storage migration to the ZFS
storage on the new hypervisor.
By following this approach, the downtime for each VM should only be the time span between being shut down on the old host and being started on the new host.
iSCSI Target & Initiator Setup
To achieve the necessary data throughput, we added a direct network connection between the old and new server consisting of two 10 Gbps links in a LACP bond configuration with static IP configuration and enabled Ethernet Jumbo frames.
The relevant network config for /etc/network/interfaces on the new server looked like this:
# The physical SFP+ interfaces
iface eno49 inet manual
iface eno50 inet manual

# The bond interface with static IP configuration
auto bond1
iface bond1 inet6 static
  address fd00::1/64
  # LACP bond configuration
  bond-slaves eno1 eno2
  bond-miimon 100
  bond-mode 802.3ad
  # Jumbo frames
  mtu 9000
The other side looks pretty much identical apart from the IP address (there we chose fd00::2) and the physical interface names.
We then proceeded to set up the iSCSI target on the old server by installing tgtd and setting up the target and LUNs:
# Install and start tgtd
apt install tgt
systemctl enable --now tgt.service
# Create the iSCSI target
tgtadm --lld iscsi --mode target --op new --tid 1 -T iqn.2025-06.old:tgt1
# Permit access for the Proxmox hypervisor
tgtadm --lld iscsi --mode target --op bind --tid 1 --initiator-address fd00::1
# Create LUN 1 from vm01's image
tgtadm --lld iscsi --mode logicalunit --op new --tid 1 --lun 1 --backing-store /dev/vg_old/vm01
# ... repeat for additional LUNs
Note that this configuration is not persisted to disk; if you want to
set up persistent tgtd config, check out man 5 targets.conf.
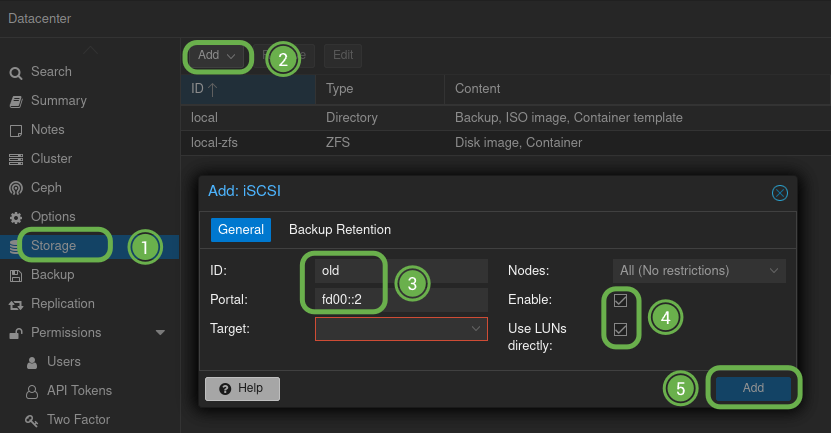
Setup of the iSCSI initiator is even simpler; it's just a few clicks in Proxmox' web interface:

- Navigate to the PVE datacenter's storage settings
- Add a new storage and choose
iSCSI. If this option is not available, you may need to install theiscsi-toolspackage. - Choose a name (ID) for the storage and enter the IP address of the iSCSI target for the portal. The target one further down should auto-complete to the IQN you set up before.
- Make sure both "Enabled" and "Use LUNs directly" are checked.
- Click "Add" to complete adding the storage.
After this is completed, you should be able to see the iSCSI LUNs as
VM images in the Proxmox node's iSCSI storage, or as disks by running
e.g. lsblk on the Proxmox system.
Side Note: Prevent LVs from Being Activated
If you're using an entire disk image as LVM physical volume in a VM (rather than have a partition table on it and use one of its partitions as PV), Proxmox will refuse to use this disk - it won't even show up in the list of LUNs.
To prevent this, you can configure the new server to ignore such a LVM
device. To do so, edit /etc/lvm/lvm.conf, navigate to the very
bottom, and add an entry to the already existing global_filter line:
devices {
     # added by pve-manager to avoid scanning ZFS zvols and Ceph rbds
     global_filter=["r|/dev/zd.*|","r|/dev/rbd.*|","r|/dev/theVGtoIgnore.*|"]
}
You may need to run systemctl restart lvm2-monitor after this change.
VM Migration
First, we gathered all the relevant information from the VM's libvirt config:
- Number of network interfaces, their MAC addresses and VLAN ID they are attached to.
- Number of CPU cores and amount of RAM.
- Number of disks and their backing LV.
- Any additional hardware attached to the VM that might need to be migrated.
We then used this information to create a matching VM in Proxmox. However, we did not boot the new VM yet! First we needed to make sure the VM's network would come up on the new host.
As the VMs' hardware layout on Proxmox is different from that on
libvirt, the network interfaces inside the VM will be named
differently if that VM is running a modern Linux system. Luckily,
these are rather predictable; on VMs created with our Proxmox VE
version, 8.4.1, without changing the default hardware layout, the
first network interface would always be named ens18, followed by
ens19 and so on for any additional interfaces.
This allowed us to change the VM's network config while it was still running on the old libvirt system, along with any other config that relied on the interface name, such as firewall rules.
At this time, we also added additional hardware to the VMs, such as a serial console, or passing through USB devices from the host.
Now it was finally time to shut down the VM on the old libvirt hypervisor, disable start on boot, and click "Start VM" in Proxmox. By doing this in rapid succession, the VM's downtime was not much longer than a regular reboot.
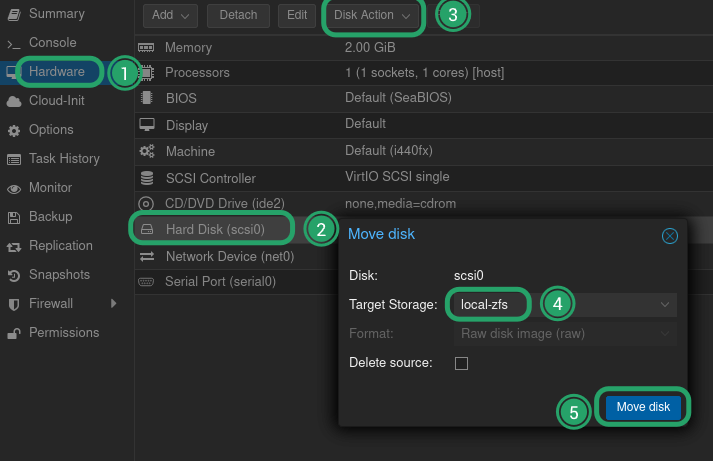
We then migrated the storage via Proxmox' live storage migration feature:

- Navigate to the VM's "Hardware" tab.
- Select the disk you want to migrate.
- Under "Disk Action", choose "Move Storage".
- Choose the target storage (
local-zfsin this case). - Click "move disk".
After the migration was completed, we were left with an additional "Unused disk" entry in the hardware list. The final step was to remove these iSCSI disks.
Once all VMs are migrated, we made sure to remove the iSCSI storage from Proxmox, and sign the Proxmox host out of the iSCSI target (unfortunately, Proxmox does not do this automatically when removing the iSCSI storage):
iscsiadm -m node -T iqn.2025-06.oldhost:tgt1 --portal fd00::2 -u
Preventing User Errors
We initially exposed all VMs' disks via iSCSI simultaneously, but quickly realized that - since they only appear as target and LUN number on the Proxmox side - there is a notable risk for accidentally assigning disks to the wrong VMs.
Therefore, we instead only exposed one VM's disks at a time, and after completing each migration performed the following steps to remove the no longer needed LUNs:
- Remove the iSCSI storage in Proxmox' web interface.
- Sign the iSCSI initator out from the target:
iscsiadm -m node -T iqn.2025-06.oldhost:tgt1 --portal fd00::2 -u - Remove the LUN on the target:
tgtadm --lld iscsi --mode logicalunit --op delete --tid 1 --lun 1. - Set up the iSCSI storage in Proxmox' web interface again.