Cisco 7900 series IP Phone Logo Converter
enLast week we discovered a box full of old Cisco 7900 series IP phones hidden deep in a pile of boxes in our hackerspace. Of course we tried to get them up and running and figure out how to configure them.
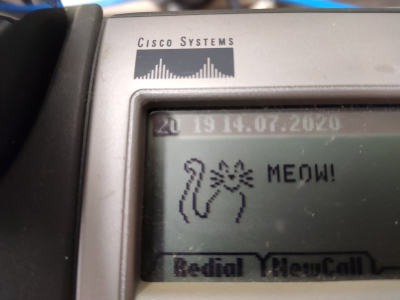
After a bit of research and reading manuals, we learned that the phones can be configured via TFTP using a binary config file format. When we learned that the phones can display a custom 88x27 monochrome image instead of the default Cisco logo, we made it our top priority to get the image customization working.
What we learned was that the images had to be served alongside the configuration via TFTP in a proprietary format. The tool to convert images into this format comes bundled with every firmware release for the phone. However, we quickly encountered some limitations:
- The converter, called
bmp2logo.exe, was a proprietary, Windows only piece of software. Luckily, the tool ran in Wine without any problems (as long as you don't mess with the input file header). - The tool required the input file to be in a very specific format, namely a 88x27 pixel, monochrome, 1 bit per pixel BMP file.
- While the image is drawn as dark pixels on a light background, the input file had to be white on black. Effectively, the colors were inverted.
We also learned that each image had to be tagged with a serial number. The phone uses this serial number to decide whether a new image has to be loaded from the TFTP server. If the serial number is the same as the number of the previous image, the new image is not loaded. So the serial number needs to be incremented by at least 1 for each new image.
To get around the limitations of the converter tool, I attempted to figure out the file format and write a free and cross-platform converter without these limitations.
Reverse Engineering the File Format
So let's have a look at a hexdump of one of those image files
converted with bmp2logo.exe:
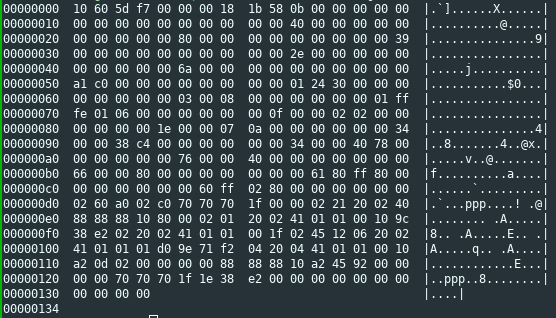
We know that the image consists of 88 x 27 = 2376 pixels. And since
the input to bmp2logo.exe has to be a 1-bit-per-pixel uncompressed
image, let's just assume that the same holds true for the output.
This would give us a payload size of 297 bytes, so with a file size of
304 bytes, there should be a 11 byte header.
The first two bytes were always the same, no matter what image was converted. So it should be fairly safe to assume that they are a magic number. The next two bytes were always different for different serial numbers or different images. Also, if the serial number was changed by one, these two bytes would also change in a fairly consistent manner, so this appeared to be some some sort of checksum. Let's just ignore that for now and put it aside for later.
The next three bytes were all zeros, followed by a byte representing
the serial number. Or so i thought at first, until I passed a serial
number of -1 to bmp2logo.exe, and got ff ff ff ff as these four
bytes, so this pretty clearly is a 32-bit representation of this
number. The next two bytes were pretty obvious as well, they are the
height and width of the image, 27 and 88 respectively.
The last byte of the header seems to represent the number of bytes that comprise a single row. I'm not entirely sure about this, but it made the most sense, especially if we assume that there are other phones out there which may support grayscale images, and need a greater color depth and consequently more bits per row.
Now, on to the last part: The checksum. I was a bit lost here, so I
just tried various ways of compressing data into 16 bits: Adding them,
xor'ing them, swapping bytes around before adding them, always
wrapping the results to 16 bits. In the end it was a typo that
brought me to the solution: Instead of sum = (sum + swapped) &
0xffff, I wrote sum = (sum + swapped) % 0xffff. So instead of
performing addition mod 65536, i was performing addition mod 65535 by
accident. The result of this turned out to be just the binary inverse
of the intended checksum, so let's add a final sum ^= 0xffff before
returning the result and call it a day.
File Format
With all that information, and verifying that the payload did indeed match the uncompressed monochrome image, we finally got our file format:
+----+----+----+----+----+----+----+----+
| 10h 60h |  CHKSUM |       SERIAL      |
+----+----+----+----+----+----+----+----+
| H  | W  | RW |                        |
+----+----+----+                        |
|                                       |
:               PAYLOAD                 :
:                                       :
|                                       |
|                                       |
+----+----+----+----+----+----+----+----+
To summarize, the file consists of an 11 byte header, followed by the payload. The header consists of:
- The magic number
0x10 0x60 - A 16 bit checksum
- The 32 bit serial number in big endian
H, the height of the image in pixels, 1 byte. Since the image is 27px high, this is 27, or0x1bW, the width of the image in pixels, 1 byte. Since the image is 88px wide, this is 88, or0x58RW, the number of bytes in a single row, 1 byte. Since the image is 88px wide and each byte holds 8 pixels at once, this is 11, or0x0b
Following the header is the image payload, with each pixel expressed as a single bit, in row-major order starting in the top left corner.
A Python implementation of the checksum algorithm could like this:
sum = 0
# Iterate the file starting at byte 4 (directly after the checksum)
# Iterate two bytes at a time (a and b), stick them together in
# reverse order, and add to the total sum mod 0xffff.
for a, b in zip(data[4::2], data[5:2]):
    sum = (sum + ((b << 8) | a)) % 0xffff
# Flip all bits in the result
sum ^= 0xffff
Implementation
Now that we know how such an image file is composed, we can write a tool to generate these files. And here's the result:
You can find the converter script on Gitlab. It can be used
in exactly the same way as the original bmp2logo.exe converter:
./ciscologo.py <serial> <infile.something> <outfile.dat>- Copy
<outfile.dat>to your TFTP server - Update the phone configuration to point to the new file
- Recompile the configuration file and copy it to your TFTP server
- Reboot your phone
Remember to increment the serial number every time you change the image, or the phone won't pick up the new file.