Mounting a 2.5" Drive Inside an APU2
enAt home, I'm using a PC Engines APU2 as a firewall and WiFi access point. Since this is the only device in my home constantly running and constantly connected to the internet, I decided to use it as an additional backup site for my servers.
However, for this to become viable, I needed to add around 200 GB of storage. I considered the following options:
- Add more mSATA storage
- Attach external (USB?) storage
- Attach a 2.5" drive internally
I quickly discarded the second option, since this approach would take up more space, which could become challenging especially since I wall-mounted the device. As for the other two options, I had a few spare 2.5" drives lying around, so I figured I'd try to use those first before buying new storage.
The Problem
Space inside the APU2 case is tight. There is some 9-10mm space between the highest parts of the system board (pin headers, capacitors, mPCIe and mSATA cards) and the case cover, at least for most parts of the board's footprint. Sure, I could just try to glue the drive to the case ceiling, but that would be both ugly and extremely cumbersome to handle. Also, I really wanted to prevent the disk from ever touching anything on the board, since most disk casings are made from metal, and the things it could touch on the board are stuffs like pin headers.
The Solution
So I decided to come up with a 3D-printed mount. It consists of 3 parts: two side parts, which are put between the board and the case walls, and a center part, on which the disk is screwed in place, held in place by the two side parts. Effectively, a "bridge" over the system board.
The first attempt already turned out pretty well, but a few problems became apparent:
- I took a wrong measurement at one point and had to move some cutouts so they would properly align with the pin headers they were meant for.
- The plugs of SATA cables (at least the ones I had lying around, as well as the PC Engines satacab1) extended below the "base line" of the disk they are plugged into. This was solved by adding another hole into the 3D-printed part.
- Due to the limited space, this design only works for drives 7mm high. The much more common 9.5mm high drives won't fit, or at least put some stress on the printed part, and possible the system board.
So I ended up using a 250GB SSD (the only 7mm drive I had lying around). However, when the PC Engines-specific SATA cable ("satacab1", required because there is no SATA power connector on the APU2 board) arrived, another problem popped up:
The cable is both quite short and rather rigid, so if you use it to connect the drive to the SATA connector on the APU2 board, you end up putting some stress on both the connector and the printed parts. This can be easily mitigated by putting a short SATA extension cable in between the satacab1 and the board's connector.
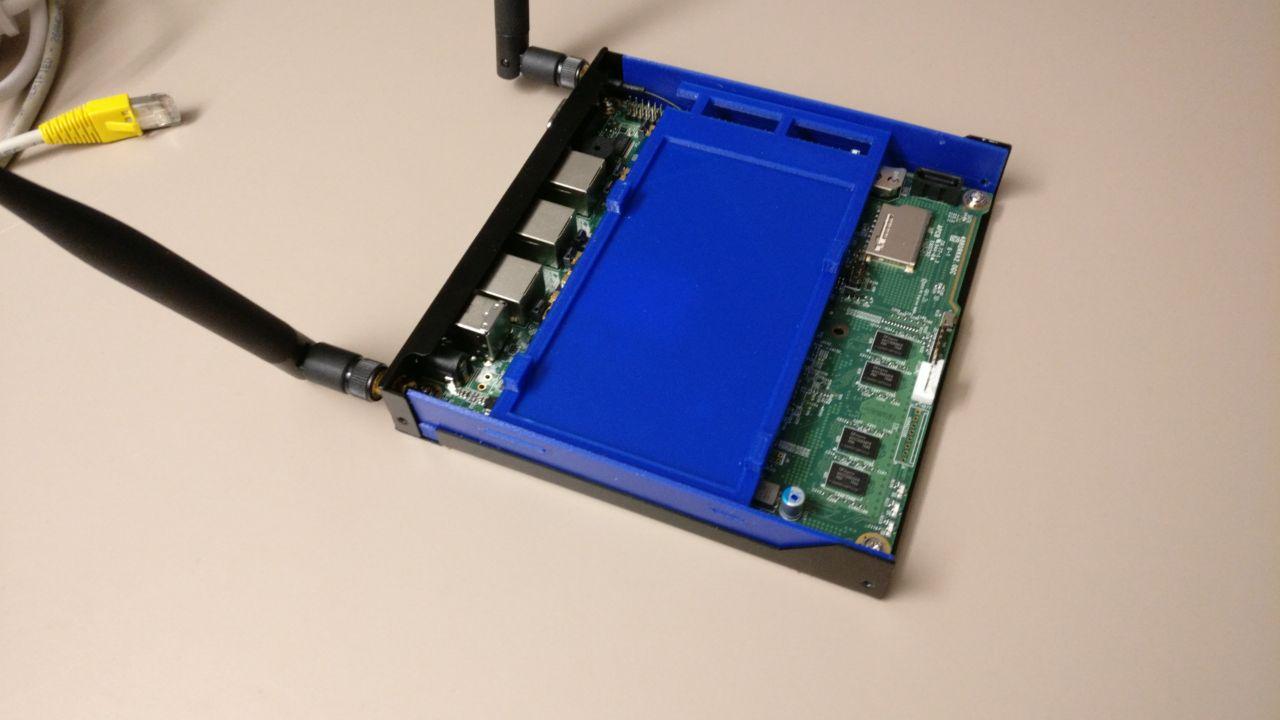
The Result
I've published the resulting design on Thingiverse. Alternatively, you can download the files directly from here. The design is licensed under the CC BY-SA 4.0 license.
The results of my print can be seen in the following photos. I made this print out of PLA using an Ultimaker 3.